
I am a TERRIBLE Blogger!!
1. Summer happened and instead of slowing down, life went into turbo mode.
2. School started.
3. School started.
4. School started.
5. I have actually been knitting!!!
As a side note:
Wind returned sun with a vengence!! We had the hottest summer in years.
Now for our regularly scheduled program:
As for the onesockitis. I couldn't shake it:( It hung on all summer until I admitted defeat and gave up on the other hand sock. Instead I created a whole new mitten couple Mr. Right-Left and Mrs. Right-Left came to life one cold day after hearing daughter complain for the 1 millionth time that her hands were cold. I am honored to introduce to you for the first time Mr. & Mrs. Right-Left!!!
And I, being their matchmaker, shall tell you the secret of my success.
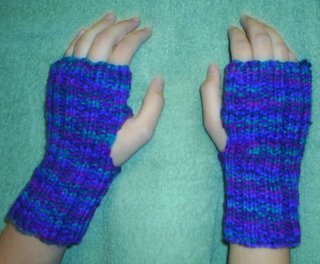
These seamless mitts are started at the finger end, so that after the thumb hole is made you can knit the wrist as long as you want.
Size: Women's average
Materials: Worsted yarn, size 7 needles, tapestry needle
Gauge: About 5 sts to 1" in K2, P2 rib, slightly stretched
Directions
-CO 36 sts. Join, being careful not to twist the stitches.
-Knit 2, Purl 2 around for as long as you want the finger part. You can try them on to see exactly how long you want it.
-On the last round bind off 4 stitches anywhere, then finish round.
(I bound off my stitches opposite the starting point because it seemed sturdier to me, but you can do it anywhere.)
-Now knit back and forth for 6 more rows, slipping the first stitch on each row for a nice finished edge. You can knit less rows back and forth for a smaller thumb hole if you want.
-At the end of the 6th (or any even) row cast the 4 stitches back on and join again. Knit in established pattern until the wrist is as long as you want. BO loosely in pattern & weave in ends. If you want you can pick up and knit the stitches to around the thumb hole to make a thumb.
 lacy mock cables, lacey squares, "N" , dolly dolphin, alien
 The next project:

This was a fun project. It used fat yarn, so it went very quickly. It is the perfect thing to wear up here where you never know what the weather is going to be like until you step outside.
And last, but not least! (drum roll please) My first sweater!!!!

Sorry, but you have to buy this one. It is only 99 cents though. The odd thing about this sweater is that what you see is supposed to be the inside. They wanted it worn the purl side out! I don't think so. I made many, many mistakes on this one. When I started I didn't realize what dk weight yarn was and I wanted it a little bigger. I used worsted weight, which would have been great and probably the right size, but I also added about 1/2 to each side. It is way too big, but it is still warm and is nicer than the house sweater it was made to replace. I learned several lessons while knitting it, so I am content. The next one will be better!!! Well, I must return to the real world, so farewell for now.
posted by The Chatty knitter | 11:01 AM
|
1 Comments
![]()